Showing posts with label how to. Show all posts

Monday, September 10, 2012

How to condition and handle polymer clay

No matter how soft polymer clay is when you unwrap it, it still needs to be conditioned.  Conditioning polymer clay redistributes the ingredients in the clay that may have settled during storage.  If you don't properly condition your clay your finished piece may be weaker and more prone to breakage.  You know your clay is properly conditioned when you can fold it without having it crack.
To condition your clay start by cutting the block of clay into thin slices using a straight blade.  Roll over each slice with a clay roller, fold it in half and repeat several times until it starts to become softer.  Continue conditioning with your hands, smooshing, rolling, and folding the clay until it becomes warm and pliable.  You can condition the clay completely by hand or finish conditioning it with a pasta machine.  Be sure to always insert the clay through the pasta machine fold first to prevent air bubbles from becoming trapped between the layers.
 
Here's a short video showing how to condition polymer clay.
Softer clays such as Sculpey III and Pardo can usually be conditioned by hand by simply kneading them for a few minutes.  Using a pasta machine makes quick work of conditioning clay and you can usually find pasta machines for a reasonable price in most craft stores and online sites that sell polymer clay.
Firmer clays can be crumbly and difficult to condition.  With these clays you need to start warming the clay and conditioning by hand before trying to run them through the pasta machine to complete the conditioning process.   One way to soften the clay is to mix in small amounts of translucent clay.  However, if you add too much you may change the color of the clay.  You can also add a few drops of liquid clay and knead it in thoroughly.  Only add a few drops at a time or you will end up with a goopy mess!  Yet another way to warm your clay in preparation for conditioning is to place wrapped blocks of clay on a Ziploc bag filled with 1/2 cup of rice that's been microwaved for 30-45 seconds.  The rice will stay warm for up to an hour.  You may want to put a cloth between the bag of rice and your clay to prevent overheating.  You don't want the clay to begin curing.  One method I use to warm stiff clay is to sit on the clay or put it in my pocket (wrapped in it's original package or in a bag).  Just never put polymer clay in the microwave for any reason.
The heat of your hands can make some clays softer and softer while you're working with them.  If your clay becomes too soft and difficult to work with you may need to set it aside for a while and let it cool off.  Some people even put it in the refrigerator for a short time.
You can make soft clay firmer by a process called leaching, which removes some of the plasticizers from the clay.  While leaching will make the clay firmer to work with, it can also lessen the strength of the finished piece.  To leach your clay sandwich thin pieces of polymer clay between several layers of printer paper.  Place your "clay sandwich" on your work tile and set a heavy book on top.  Check your clay every so often until the desired firmness is achieved.  This process can take anywhere from a few hours to a few days.  Replace the paper when it appears saturated.  It will look like a grease stain on the paper.  And remember not to leave unbaked clay on painted, varnished, or lacquered surfaces, as the clay will damage them.
When working with different colors of clay start with the lightest colors first whenever possible.  Light colored clays can be difficult to keep clean since they will pick up anything on your hands, tools, or work surface. This post has more tips on working with light colored clay: Tips For Sculpting With White and Light Colored Polymer Clay.  Baby wipes work well for cleaning your hands not only in between colors, but every so often while you're working with your light color.  I also wipe down my tools to be sure there are no bits of darker clay on them.  Just be sure your wipes are lint free and don't leave fine particles on your hands, as these will quickly transfer to the clay.
My preferred work surface is a ceramic tile.  Tiles come in a variety of sizes and are fairly inexpensive at home improvement stores like Home Depot or Lowes.  They're smooth and easy to clean and don't affect the clay.  The tiles are nearly impervious to scratching and can go right from your work table to the oven.  I have tiles in several sizes for different sized projects.
If you don't want your clay to stick to your tile parchment type deli paper works quite nicely.  Placing your project on this allows you to move it around without distorting it.  I find this very useful when cutting out leaves and flowers.  I can cut them out on the paper and easily remove them to place them on my sculpture.  you can find this deli paper, also known as patty paper, in bulk at grocery warehouses and restaurant supply stores.  Baking on this paper also helps prevent shiny spots from forming on the bottom of your piece.

I hope these tips have helped you learn some of the basics of working with polymer clay!


Sunday, February 12, 2012

Tutorial from CreativeCritters- How to Make Stamped Heart Dangle Earrings

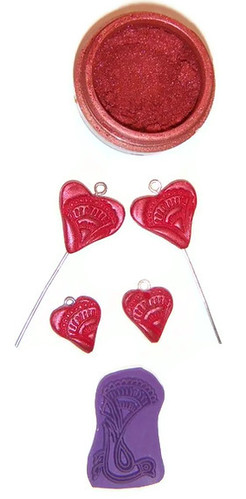
 This tutorial was written by Michelle of CreativeCritters and would make a great project for Valentines Day.  These pretty red heart earrings don't take too long to make and are completely customizable.  Use any color polymer clay that suits your fancy, and experiment with different stamps and Pearl Ex powders to create the perfect earrings to match your taste.

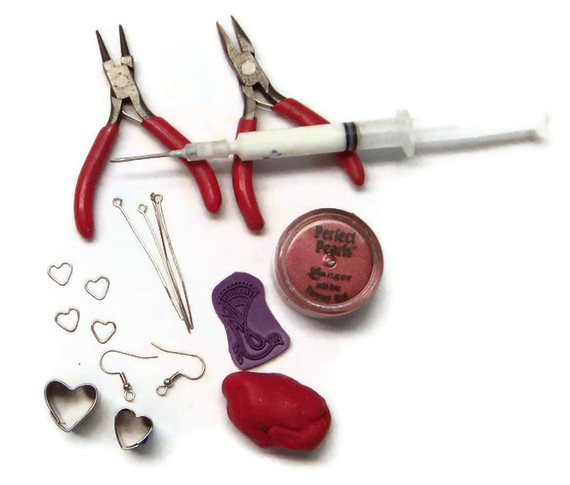
Materials needed:
red polymer clay (I used Premo Red Sparkle)
liquid polymer clay (I use a syringe to apply mine)
red Pearl Ex or Ranger Perfect Pearls powder
stamp of choice (I chose a small peacock stamp and just use the tail)
2 heart shaped cutters, 1 larger, 1 smaller
French wire ear hooks, or your choice of earrings
4 2" eye hooks
4 heart shaped jump rings (you can also use regular round jump rings)
round nose pliers
flat nose pliers
wire cutters


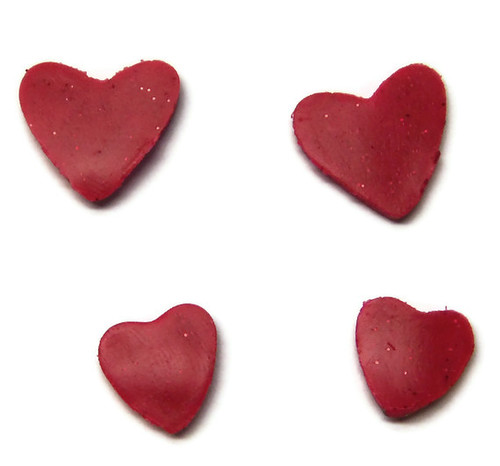
Condition your clay by running it through your pasta machine about 20 times and roll it out on the #3 setting on your pasta machine.  You can also condition the clay by hand and use a roller to flatten the clay if you don't have a pasta machine.  Use the large cutter to cut out 2 hearts. Do the same with the small cutter. These will be the backs of your earrings.


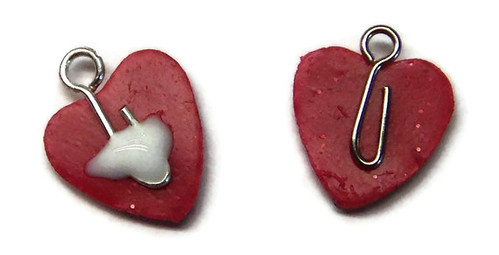
Place one eye hook on each of the larger hearts, as shown in the picture below. Add a little liquid polymer clay over the wires. This helps secure the wire and will also help the top heart adhere to the bottom one. We'll cut the eye pins to the proper length and form a loop at the bottom after they're baked.


For the smaller hearts cut the remaining 2 eye hooks to about 3/4" long and bend the end to form a hook.  Place these on the smaller hearts as shown and cover with a little liquid polymer clay.

Nest roll your remaining red clay out on the #1 (thickest) setting of your pasta machine and use the heart cutters to cut out 2 more large hearts and 2 more small hearts, which will become the front of the earrings.  Lay these on top of the hearts with the eye pins. Gently press the two sides of the hearts together to assure there are no air bubbles. Smooth the edges and refine the shape of the hearts.


Next use your stamp to impress a design on each of the hearts.  Any stamp with nice detail will work.  I just used the tail of the peacock for these hearts.  Spritzing the stamp with water will help to keep it from sticking to the clay.  I always keep a spray bottle handy.  This also works as a release agent for molds (spritz the mold, then press the clay into the mold).  Gently blot off any excess water from your stamped hearts and use your finger to gently rub the red Pearl Ex powder onto the raised surfaces of the design.  If your hearts become slightly squished you can reshape them now.   If excess liquid polymer clay comes out of the seams or the hole for the eye pin just carefully wipe it away.


If you're using Premo polymer clay bake the earrings at 275 degrees for 30 minutes.  If you're using another brand of clay be sure to check the baking directions on the package. An oven thermometer can help make sure your oven is at the proper temperature. After the hearts are cool brush them with two coats of varnish to protect the Pearl Ex powder.  I used Fimo Gloss Varnish for these.  Always make sure your varnish is compatible with polymer clay.  If it's not your piece may never dry completely. Once the varnish has dried (about 20 minutes for the Fimo varnish) you can assemble your earrings.

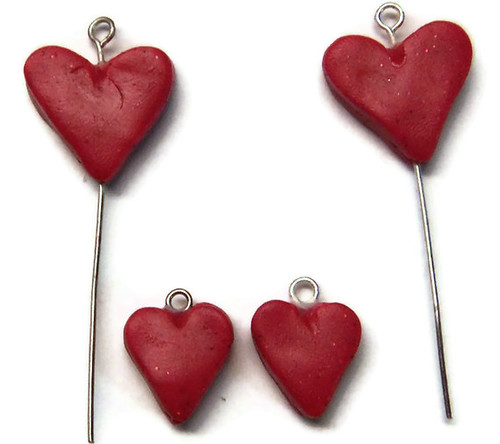
To assemble your earrings, cut the end of the eye pin on the larger hearts to about 1/4" long and use your round nose pliers to form a loop.  Use the heart shaped jump rings to attach the large hearts to the ear wires and the small hearts to the large ones.  You should end up with something that looks like this. If you can't find heart shaped jump rings (I got mine from Fire Mountain Gems) you can also use regular round jump rings.


And there you go!  Pretty red stamped polymer clay earrings- perfect for Valentines Day! ;-)
~Michelle of CreativeCritters 

Friday, January 13, 2012

How to make a striped pen- polymer clay tutorial by Kael Mijoy

Covering pens in polymer clay is a fun way to jazz them up and this Striped Pen tutorial from Smoosher member Korrina of Kael Mijoy is an easy project that even beginners can do.
 
Korrina writes: 
This is a really quick and easy way to cover a pen that can be quite striking in the right colors.  It's also a good way to use up any strings you have left laying around from your last filligree project.  You can find out more about covering pens in this blog post and more about extruding polymer clay strings in this one. 
Supplies Needed:
1 Bic Round Stic pen or similar
Several colors of clay strings (about 6-7 feet altogether)
Tools Needed:
Round-nose pliers
Extruder (unless you've already made your strings)
Sharp craft knife (a tissue blade will work but I prefer my X-acto knife for more precision)

Directions: 
Extrude your clay (if you haven't already).  I'm using strings leftover from a filigree project.  You won't need near this much, it's just my leftovers.

This is only the beginning of the tutorial, but if you want to see how this multicolored polymer clay spaghetti turns into a pretty pen go to http://www.kaelmijoy.blogspot.com/2012/01/polymer-clay-tutorial-striped-pen.html.  You'll find plenty of other interesting and fun tutorials on this blog as well!
Kael Mijoy can also be found online on Flickr, Twitter, http://www.kaelmijoy.blogspot.com/, and her ArtFire shop.

Monday, January 2, 2012

How To Make Landscape Jasper- Faux Stone Tutorial by Tina Holden

 This post was written by Smoosher member Tina Holden of Beadcomber.
Tina Holden’s Faux Stone Tutorial- Landscape Jasper
Jasper is often named according to its pattern: landscape jasper, the most popular, offers a small panorama in stone. Often the name Landscape or Picture is interchanged for this type of Jasper. I’ve devised a simple way to recreate it with polymer clay. You only require clay, some chalk, your hands and fingers for this technique. No blade, no machine, not even a roller! This maybe the shortest tutorial I have ever written as well, lol. Stone examples:

Polymer Clay bead:
Materials:
Ecru polymer clay
Chalk/Artist soft chalk pastels in beige, rust, brown, dark brown, black
Tools:
Pasta machine or Acrylic Roller (optional)
1) Condition and roll clay on largest setting of pasta machine or use an acrylic roller to roll to about a 1/8” thickness. You can also flatten the clay using your fingers as the objective isn’t a smooth flat sheet, but rough strips of clay. Let it rest a bit or put in the fridge/freezer for a couple of minutes as warm clay doesn’t tear up easily. Tear strips, various widths and sizes.


2) Crumple the pieces up and smoosh them together. Don’t roll smooth, you want the rough edges.


3) Apply the various chalk colours on the outside of the rough pieces. Start with the lightest colour and add darker colours last. Your finger is the paint brush. Don’t worry if your piece has fingerprints, they actually are an added feature here, creating a nice matrix that won’t look like a fingerprint in the finished bead, but more like speckles!


4) Roll or shape your piece flat and again. Again, let rest or put in fridge or freezer to cool. Tear into strips and pieces like before.


This time, before assembling and smooshing the pieces together, apply dark brown and black on the rough edges of some strips. Then smoosh together and roll into a ball for a bead, or flatten and smooth for a pendant, or create
another shape. Now is the time to smooth away any fingerprints as well, sorry, lol. You may find it helpful to use a dusting of cornstarch on your hands and fingers. Cornstarch clogs up those fine crevices and ridges in your fingers and hands and make the smoothing process easier
.

What do you think? Simple, huh?
You can also use other base colours and other chalk colours for this Landscape technique.

You can find Beadcomber online at http://beadcomber.artfire.com , http://beadcomber.blogspot.com,
http://facebook.com/beadcomber, http://flickr.com/tinaholden.
Thanks for reading!

Find the Smooshers on Facebook 
Visit the Smooshers Blog
Check out the Smooshers guild on ArtFire   

Friday, December 2, 2011

Mica Shift Pendant Tutorial- written by DreamWeaversDesigns

This tutorial was written by Smooshers member DreamWeaversDesigns, originally on her ArtFire blog.  She was kind enough to share the post with us as well.
Mica Shift pendant tutorial.

1003

The above necklace and earring set were made using the mica shift technique.  Finished pieces were placed on memory wire.  Black crystals and white glass beads were used to complete the look.

I love mica shift!!  Mica shift is a polymer clay technique that shows up as a 3D or ghost image.  There are certain clays that have mica particles in them and when these particles are manipulated {by rolling the clay in one direction over and over with a pasta machine}, the mica lines up.  When stamped, shaved, or just cut, the clay has areas that are darker and those that are lighter, giving a two toned effect.  The images one can capture are amazing; the 3D effect is awesome.  Pearlized clay can also be used to achieve the ghost image.  The following is my method for getting this great look.  I wanted to make this tutorial for those who may be interested in the technique, but were hesitant to try it.  I hope it's not too long!!

Start by assembling your tools.  I used Premo pearl clay, cranberry Adirondak ink, a flexible blade, a non flexible blade, an acrylic roller, stamp of choice and my pasta machine.

 1005 1006 

Cut off the amount of clay you think you will need.  I used 1/4 of the 2 oz pack, which is plenty for the pendant I am making.  I then roll out the clay on the widest setting to get ready for applying my alcohol ink to tint {This was a great tip from one of the Smoosher's!}.  Note, you can darken the clay by reapplying more ink after the first coat has dried.  Placed your prepared clay on your tile.
1007  1008 1009 1010 1011 1012

After the ink has dried on your clay, fold it in half and start running it through the pasta machine.  Inserting the fold first will express all the air in between the 2 halves.  I rolled my clay through the pasta machine about 30 times to make sure the ink was thoroughly mixed.

Once you have selected your stamp, impress the prepared clay.  {Make sure you apply even pressure so the design is deep enough.  Sometimes this takes practice.  The great thing about polymer clay and this technique is, if you make a mistake, you can start all over.}  Once I was satisfied with my stamped impression, I began the slicing process.  Due to the pressure used to imprint the stamp, my clay is good and stuck to the tile.  I hold the non-flexible blade at an angle, starting at the side farthest from me.  Then I drag the blade across the piece, slowly shaving off the raised layers of the stamped impression.  {This too takes practice.  I have made many mistakes and sliced too deep.}  Once you have been doing it for a while, you get a feel for how to hold your hands to make the right depth slices.  The goal is to shave off all the raised areas so your clay is fairly smooth. 

1014 1015 1016 1017 1018 

After I have shaved off all the raised areas, I used my acrylic roller to flatten the piece even more. {Some people prefer to roll their piece through the pasta machine to achieve a smooth surface; I prefer using my roller}  Use a light hand when rolling and change directions to avoid distorting the image. 
Because of the pressure to apply your stamp; then the slices you take off, you are left with a thinner sheet of clay.  Gently use your blade to remove the prepared clay off the tile.

1019 1020 1021 1022
  I like to use the remainder of my tinted clay, rolled through the pasta machine at the widest setting, to use as a backing.  Place the shaved sheet over the plain sheet and roll with the acrylic roller to remove any air bubbles.  Next I cut out my shape using the flexible blade, gently push down the edges of the piece and smooth by running my fingers down the side.  I feel this gives the pendant a more finished look.  Then I pierced the top for stringing the piece, embellished with a flat back crystal and baked according to the instructions on the clay pack in my convection oven.  For this piece I baked it for 40 minutes.  Note: please observe all safety precautions when working with clay, sharp tools and the oven.  Keep the area well ventilated and never use tools, utensils or ovens for food items after used with the clay.

1032 1033 1034 1035 1036 1038 1039 1040 1041

Once my baking was done, I immediately placed the pendant in an ice bath.  I feel this brings up the image.  After soaking in ice for 20-30 minutes, I was able to use my micro mesh pads to sand the piece, than I buffed it to a high shine on my power buffing machine.  Here is the finished product, ready for stringing.

1043

Thanks for taking the time to review this, my first, written tutorial.  Feel free to let me know what you think!!


You can also find DreamWeaversDesigns online at  http://www.flickr.com/photos/j-mw/, and http://dreamweaversdesigns.blogspot.com/.


Find the Smooshers on Facebook 
Visit the Smooshers Blog
Check out the Smooshers guild on ArtFire 

Sunday, November 20, 2011

How To Make a Polymer Clay Poinsettia Cane by Artmakers Worlds

This post was written by Jen of Artmakers Worlds on her own blog located at http://www.artfire.com/ext/shop/blog/ArtmakersWorlds and she was kind enough to let me share it here as well.


Just for fun, the making of a poinsettia cane.

You can find this cane listing by clicking here.

Posted Image


I won't walk everyone through every single step in cane building, in fact I didn't even think to photograph this until I had a good start. But if you want an idea of how canes are made, there is plenty of info here.
Enjoy.


The petals and leaves are all made the same way. It's a basic leaf cane. In short, you run a few colors side by side through a pasta machine, fold and run over and over. This is called a "skinner blend." Roll that up and you have a "plug." Each end of this plug will be a different shade. Well what I want is a plug that runs one color along one side, not each end. So I compress the ends together and stretch the sides until I have a plug with colors side by side instead of end to end. Cut that and add the veins, and I'll show this later in the demo.


The center part is simple. Make a log of one color, wrap it with another. Reduce, cut into several equal sections, put them side by side, reduce again. Do this as many times as you need to get the number of center dots you want.

Posted Image

So I've made my basic leaf in red, reduced that long enough to cut a dozen sections. The first six got tacked to my center piece,
Now I snug the next six around those. And that's our flower.

Posted Image

Next, I need to find a green to use for the leaves. As it turns out the only green I have on hand is a real bright one. Too bright.
Well before I got into polymer clay I was a painter so blending colors is second nature to me. The way to "tone down" an obnoxious shade of anything is to use a bit of it's opposite on the color wheel. The opposite of green is red. Just a touch of red will bring down the yikes factor just enough to make a nice leaf. The scraps I had from the ends of the flower part is perfect. The photo shows the green I started with and what a touch of red blended in makes.
Now I have enough to make the dark leaf veins as well as some shadow at the base of the leaves.

So again, I made a plug, then compressed it and pulled it sideways to make a plug that is dark on one side and light on the other.
As with any basic leaf, slice this in half and insert a sheet of dark green. Slice both sides and insert sheets as the leaf veins. Voila. Now reduce that long enough to make six or seven sections.
Posted Image Posted Image


So here I've added the reduced leaf sections. How many you add at this point is not that important. Note I have two leaves side by side on one spot.
Posted Image


Now it's time to start packing with translucent. Being careful to make triangular shapes that fit between the leaves so their shapes don't get mushed together.
Posted Image


And here is my cane fully assembled and ready to start reducing.
Posted Image
Note, I'm not covering how to reduce a cane. Basically I start by simply squeezing this thing. Squeeze, turn, squeeze, turn. Once it grows in length enough I start squeezing the center until it forms sort of a waistline. This is how all canes get reduced. It's time consuming, and sometimes it's a bit of a work out. Just gotta go slow, compress from the center out towards the ends. All those air spaces will be squeezed out and the design gets compressed together.
Never roll a cane to reduce. That will twist the design and trap in any air pockets.


Here is my smiling mug (yikes) holding the cane just before the reducing process. Gives you and idea how big cans are before they get shrunk and stretched. This one is actually a medium size. I've made a few that were twice as big as this. If not larger. those are such a work out to reduce though, every time I end up with one that big I say to myself "self? Don't DO that again."
This one was not a problem to reduce. Good size.
Posted Image

And finally, here are my freshly reduced and cut pieces ready to be wrapped and stored until some wonderful customer decides to buy and turn into creative things.
Posted Image

Hope you enjoyed the life of a cane.

Jen

Find Artmakers Worlds online at http://www.flickr.co...rtmakersworlds/, http://twitter.com/#!/artmakersworlds, and http://artmakersworlds.com/.http://artmakersworlds.com/.

Find the Smooshers on Facebook 
Visit the Smooshers Blog
Join the conversation on the Smooshers forums