Showing posts with label Tool Drool. Show all posts

Wednesday, August 3, 2011

Favorite Tool: Push Drill

by tonjastreasures

Besides the usual pasta machine, acrylic rod and clay blade I LOVE my push drill !!! Everyone should invest in one :) Couldn't live without it.

posted image

posted image
Visit tonjastreasures.artfire.com

Tuesday, June 7, 2011

Favorite Tool: Wood Carving Gouge

From a destash at a daycare center I got this "new" tool (with differently shaped tips) to use with polymer clay. I'm not sure if it can be called a favorite tool yet because I only started working with it, but the potential is definitely there.

Carving


One of my first carving experiences was with this piece.

Summer scent

Visit CatsWire.artfire.com

Tuesday, February 8, 2011

Favorite Tool: Tweezers

Oddly enough, my two favorite tools are an ice pick and tweezers. I use the ice pick to push the clay down into small, tight corners, create texture, etc. The tweezers are essential for all of the small bead inlays that I do. In the end though, my fingers are my ultimate favorite tool.


Visit phoenixartstudio.artfire.com

Tuesday, February 1, 2011

Favorite Tool: Dental Pick

My favorite tool by far is this silly dental pick, probably cheapest, too! I love it, it's the tool I'm always looking for and probably use the most. I use the tip for scratching fine lines or I can dig the edge into the clay for a deeper impression. It's so awesome for adding that bit of random texture to polymer clay.


desertrubble.artfire.com

Friday, January 14, 2011

Favorite Tool: handmade extra hands


ArtFairlyAware


My favorite tool is something I use with every bead or pendant I create. It's actually a sugar shaker that I bought at the dollar store. I thread the beads onto bamboo skewers and then paint on my clear acrylic coat. The holes in the sugar shaker are the perfect size for holding the skewers while the beads dry. I just replace the skewers as needed.


Visit ArtFairlyAware.artfire.com

Thursday, January 6, 2011

Ask A Smoosher: Tools

Boo asks...
what's the one tool you *have* to have? any tips for finishing up beads and cabs would be wonderful.


Gingerbells
The one tool I can't do with out besides my hand is my pasta machine. I couldn't get the beautiful color blends and mica shifts with out it.
Tips for finishing up cabs and beads...Sand paper is your friend. I make all of my cabs and beads very smooth using ice water to smooth out every bump and finger print before curing. When they are cured I use some very fine sandpaper and then buff them to a perfect glassy finish.

DesertWindDesigns
Have to agree with Gingerbell about the pasta machine. I couldn't accomplish anything without it. I don't think I could get the Premo conditioned, let alone Kato!
Sometimes, simple tools are the best! In my work, I tend towards a rustic or earthy look. And, well hands and fingers work great for that! Fingerprints make great, subtle texture. And sometimes I go out of my way to make fingerprints. I almost always hand roll my beads instead of using a bead roller - I like the imperfect round shape of hand rolling.
I also like to hand roll coils for my beads - I like the thick-thin of the hand rolled coils.

averilpam
Other than the pasta machine which is an absolute essential, at the moment I'm enjoying using stamps and texture sheets. I don't know if they'd be classed as a tool but I love them and I've collected quite a few.

gundowerks
have so many tools I love!! I think the one I reach for most, though, is my exacto knife. I actually have a set of them, and various blades, and I use them for tons of trimming and different work. IMHO exacto knives are absolute "can't live without" tools. I recommend the sets they have at American Science and Surplus (sciplus.com).
For cabs I have to use a mold - I have premade cab molds, or if I want something odd shaped/sized I'll make my own and mold it myself. After molding I smooth as much as I can, and even out the backs as much as I can, then cure. My sanding techniques seem a little excessive to some, but they're necessary. For cabs and beads I use a tumbler, bigger items I sand by hand. I start with 220 wet/dry (for anything that's rough, smoother stuff can start with a higher grit). I go up by grit: 220/320/400/600/800/1000/1200/1600/1800/2000 (I think I got all the grits right). Never skip a grit after you start (in other words, don't go out of sequence or skip one in the sequence). Keep a towel on your lap and a bowl of warm water with a teeny bit of dish soap in it to rewet the piece and rinse the sandpaper. For the tumbler cut your sandpaper up into 1/4 inch squares, and use several full sheets per grit. Keep your grips carefully labeled and don't let them get mixed up! Tumble for several hours per grit, at least, with a small bit of warm soapy water added. I usually buff with denim, and have a bag of small denim scraps to put into the tumbler (dry) after the sandpaper to buff.

CreativeCritters
I'm another clayer who can't live without her pasta machine! I use it to condition all my clay, as well as create color blends and I use it with texture plates to create textured sheets of clay. Another tool I find myself reaching for constantly would be my knitting needle. I have several sizes, from very thin to rather thick, and they each have their uses. They're perfect for smoothing clay, and getting into tiny corners where your fingers won't fit. Sometimes I use them to texture the clay as well. That's how I achieve the look of fur on my animals. They also work well to make eye sockets and nostrils, and shape ears (for animals, humans, fairies, etc). If I had nothing more than clay, a pasta machine, and a knitting needle or two, I could create just about anything!

PositivelyCharmingThings
My pasta machine is a staple at my work table. Next to that, I think my circle cutters, for getting uniform bead sizes when needed, and also makes it easy to measure colors for color mixing.
Cabs I usually hand-form and hand-sand, although I am a little lax with the different grits, I just start at 400, then 1000, 1200, 2000, and last 4000. Then I buff using my Dremel and the buffing wheel attachment that it came with.

CatsWire
I'm still pretty much toolless, but yes, to buy the pasta machine was a really smart move.
Apart from that I do a lot with my sculpture tools and of course my beloved toothpicks.
I hardly ever make beads, so I don't have a tip for that which the others haven't already given.

intothedawn
I am another one who cannot live without my pasta machine. I did hold out for a long while, trying to use just an acrylic roller, but it is so much faster & easier to use a pasta machine for conditioning clays. Having a pasta machine has broadened my color palette since it is now easier to mix colors. It is also a must have for all the mosaic work that I do-- very helpful in making smooth tiles of an even thickness.
However, running a close 2nd & 3rd place are my cutters & texture sheets/rubber stamps! I use them for almost everything I create and I'm always looking for more unique cutters & textures. I use them for making mosaic tiles, pendants, beads and more.
How I finish beads & cabs depends on how they are made. If it is a textured bead or cab, then all they need is a glaze/varnish. I prefer to use Flecto Diamond Varathane. I use a brush to apply, then bake the item at 250*F for about 25 minutes to set. If it is a smooth bead or cab, then I will wet sand. I usually take the easy way out and let my tumbler do the work for me. I sand with 400 grit for 12-16 hours, then 600 grit for another 12-16 hours. Often, because of the length of time sanded, these are the only 2 grits I need to use for a nice smooth bead. Then I'll buff them with a felt pad with my rotary tool, which is like a Dremel, and I generally like to varnish them as well. The exception is mica shift pieces. Those I tend to hand-sand with 400, 600, 800, 1000 and 1200 grit wet sandpaper and water with a drop of dish soap, then buff with a felt pad on my rotary tool for a glassy sheen.

(If you click Tool Drool on the left column of this blog you will see many more.)

Tuesday, January 4, 2011

Favorite Tool: Knitting Needles

My favorite tool comes in many sizes, and has lots of different uses. I've found aluminum knitting needles to be invaluable when sculpting in polymer clay.


CreativeCritters


I have several different sizes and use them to smooth clay, join two pieces of clay, get into crevices my fingers can't reach, and add texture to the clay. For dragons I use the tip to make dimpled impressions and give their skin a bumpy texture. For furry animals I pull the tip through the clay to create waves, and a generally furry look. The larger needles work well for very fluffy fur, and the smaller needles work well for creatures with finer, sleeker fur. I also use the needles as pick up tools for tiny pieces of clay like dragon scales, roof shingles, eye lids, and noses. I use the needle to place the clay carefully, and then smooth it into shape. Knitting needles work well for making holes for eyes, adding nostrils, and hollowing out ears. I've modified one of my knitting needles and added an embroidery needle to one end. This is useful for the tiniest of pieces. When sculpting in miniatures sometimes my fingers are just too big, and these tools are the perfect solution!


I used all of my knitting needles when sculpting my Bewilderbeast. He has lots of texture in his fur. I used the needles to smooth and attach clay to the body and legs in stages. I attached the feathers to the pre-baked wings using the knitting needles as well. Much of the shaping of the face and head was done with the help of the needles too. And these are the same knitting needles I've had since I started sculpting, more than 10 years ago! I've certainly gotten my use out of them!

Visit CreativeCritter.artfire.com

Friday, September 17, 2010

Favorite Tool: Handmade Silicon Mold

JanetSaw

I made my own moulds to make raspberries and blackberries. There really isn't any other way to make these berries. It would be way too tedious to do them by hand! First, I made the master berries from tiny glass microbeads glued onto a toothpick. I put those into silicone rubber putty, and once hardened, it makes superb polymer clay raspberries. I have written a blog post on exactly how I use them.


I use liquid clay to fill the cavities. This does cause bubbles to get trapped, but with enough patience, I can get most air bubbles out by gently poking and prodding with a toothpick. Once they are all filled, I bake the mould together with clay at 110 degrees C for 30 mins. I have not tried this with clays that bake at higher temperatures, but for Fimo, the mould survives very well and can be used over and over.

I also use various other flexible silicone moulds to make cupcake bottoms and pie bottoms. They are really necessary to make cupcake bottoms that look even, with a good pattern. I tried sculpting these by hand, but it never worked. I also bake these together with clay in the oven, and this ensures that I never distort the shape.


To make this cupcake, I bake in several stages. First, the cupcake base inside the mould. Then, I put the cupcake top on, and bake again, and finally, I decorate the cupcake with icing and sprinkles.

Visit JanetSaw.artfire.com She sells these handmade molds and so much more.

Thursday, August 26, 2010

Favorite Tool: cookie cutters

A lot of my favorite tools come from the baking aisle of the grocery store.
For example, cookie cutters have saved many of my projects:


I buy the cookie cutter sets that come in graduated sizes.

Another favorite of mine is parchment paper. I will cut a piece that is just large enough to cover my baking tile and work the clay on it, and then pop all three in the oven. This is especially useful if you are using a very sticky clay.


My last example is toothpicks. I think I have used them for just about everything. I have used them to apply alcohol ink, shape edges, remove fuzz and widening bead holes. I usually pierce my beads with a straight pin and then gently enlarge the hole with a toothpick.


Visit ValeriesStuff.artfire.com

Thursday, August 19, 2010

Extruder Attachment part 2

Someone contacted me and asked for close up photos of my extruder attachment for a caulking gun seen in this post. My husband works with stainless steel so that is what he used to make it with.


It is just stainless steel plates, cut and welded to a stainless steel pipe. The pipe is a larger diameter than my extruder so I have masking tape wrapped around it to prevent it from moving around inside the pipe.


This is the bottom where the clay comes out when you squeeze the handle of the caulking gun.


Hope that helps.

Thursday, August 12, 2010

Favorite Tool: Extruder Attachment for Cauking Gun

When I first started Smooshing polymer clay many years ago, my little sister gave me an plunger type extruder. I never really had a use for it until this year when I took up weaving polymer clay into miniature baskets.


Even with well conditioned clay I found it difficult to push that plunger for very long. My husband made this attachment for me to use with a caulking gun.


It is made of stainless steel. The masking tape around the extruder insures that it sets perfectly in the center of the attachment without wobbling around.


That tool along with a tip given to me by Carolyn of 2GoodClaymates to use armorall in the extruder has saved my hands and made it possible for me to weave polymer clay. Without having to buy a new extruder. :^)

Visit ColtPixy.artfire.com


Part 2 of Extruder attachment post.

Thursday, July 8, 2010

Favorite Tool: toothpicks

Some of my favorite tools are simple toothpicks and kebab skewers.


I can use them to texturize something, to pick up little pieces of clay and put them in the right spot, to make bead holes, to press down edges. They are cheap, re-usable and sometimes you can even use them in a project.
There is no clay play session without my toothpicks.


Visit CatsWire.artfire.com

Thursday, July 1, 2010

Favorite Tool: bead roller

One of my favorite tools is the bead roller. This particular one makes three different shapes, consistently the same size.


And by varying the clay colors, one can get similar resulting patterns again and again. Here's a few different ones I tried. The bicone bead can be flattened for a nice sized lentil bead.


To keep the pattern rotating around the bead, keep the bead facing the same direction each pass through the roller. By the 5th or 6th pass through the roller, you will see a definite pattern. (this is a tip I learned according to Carol Blackburn)

And even just slicing off a twisted log and running it through the bead roller produced pretty beads.


I think I'll go whip out a new pair of earrings for work tomorrow!

Visit ClayItAgain.artfire.com

Thursday, June 24, 2010

Favorite Tool: Drinking Straws

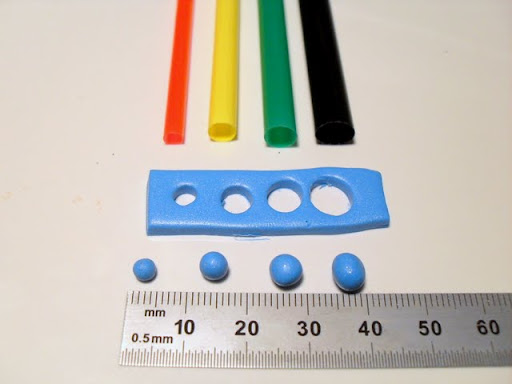
This is my most recent collection for my polymer clay tool box. I was wondering how to make the same size balls for various projects since I am not very good at cutting a same size piece from the log each time. We had stopped at a restaurant one day and while talking about what to do, I thought maybe a straw would work. So now I try to get straws of different sizes when I can.


I roll my clay out on my pasta machine on #5 thickness. Then depending on which size I want, I will try a couple of sizes and see which way I want to go. Larger or smaller. You can also combine 1/2 of a piece or another whole piece to create an in between size. By using the straws, I am able to get the same size for each piece. No more guesswork. And straws are everywhere.

You might want to try different pasta settings to see what works best for you. Lots of possibilities here. Enjoy.

Visit SassyClayCreations.artfire.com

Thursday, June 17, 2010

Favorite Tool: Wax Carving Tools

I have lots of sculpting tools. Some are handmade, some are not. I will show them to you in future posts but first I wanted to show you my very favorite, wax carvers. They are stainless steel and some of them look very much like dental tools.

wax carvers


I bought my set on ebay back in 2002 (you can find them in art supply stores too) and have used them daily ever since. I remember looking at the image on the listing page before clicking buy-it-now and thinking I would never use that one that is second up from the bottom. It is the one I use the most. Funny how things work out like that.

Here are a few things that I have made using these tools....

wip magnet

bitchy peas necklace

pixie

Visit ColtPixy.artfire.com

Thursday, June 3, 2010

Favorite Tool: Scroll Saw

By cnewcomb

My favorite tool is my variable speed scroll saw. With my scroll saw, I
am able to make many different patterns that I will then take Polymer
Clay and incorporate into the the areas that I've cut out.


Visit cnewcomb.artfire.com

Wednesday, May 12, 2010

Tool Drool: Paint Pushers

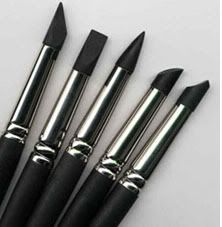
Paint pushers, also known as Color Shapers, are silcone tools originally made for painters-- but clayers found that these are great tools to use with polymer clay, too!

Fantasy Clay says: Aside from a needle tool, my favorite is a #2 taper end clay shaper. Using these tool I can make almost anything. These are absolutes, even my exacto knife comes in after these.


The taper point (middle one)- great for smoothing seams, clay, shaping-it's strong and flexible, good for eye holes, etc. etc. I use it for shaping and manipulating the clay, handy for where my fingers are too big. I use the angled circle thingy (second from right), which makes good smilies.


WireRunsThroughIt says: They are amazing, I can now smooth out those lines in tight places and refine my cabs edges with them, I also use them to smooth the surface of anything flat. Really great tools!

Thursday, April 15, 2010

Favorite Tool: Scale Calculator

by ColtPixy

I am currently focusing on miniatures and making them to scale is very important to me.

finished basket


Because of this I would have to say that along with rulers and my digital caliper my favorite tool is a Hobby Calculator at Jim's Dollhouse Pages.
If you follow the directions at the bottom of his page you can even use it when not online.


It is easy to use, converts to many different scales and has been very useful to me.

Visit ColtPixy.artfire.com

Tuesday, April 6, 2010

Favorite Tool: Needle Tool

This article is written by: intothedawn

One of my favorite tools is the simple needle tool, because it is so versatile. I have two that I'm constantly using, one of which was made for me by fellow Smoosher, ColtPixy.
I can use them to poke holes in beads or pendants, but mostly I use them for detail work on sculpted pieces. Needle tools work great for making patterns in clay...


... creating detail lines for feathers...

... or adding veins to leaves...

And those are just a few of the possible uses for needle tools!

Visit intothedawn.artfire.com

Thursday, March 25, 2010

Favorite Tool: Extruder

This post is written by 2GoodClaymates


My favorite tool is definitely the extruder.
Photobucket

I use it for creating canes like the one used to cover this mirror compact and pen.
Photobucket

I also love to create filigree patterns like the ones in the cross pendants shown. Different colored clay is extruded in tiny strands and then arranged into a pattern.
Photobucket

My favorite use for the extruder is finishing off my pieces with a filigree design used on the pen and mirror compact shown above as well as these bangles which is actually hiding the seam.
Photobucket

I have a few tips to share on making better use with your extruder. Before inserting the log of clay into the chamber, give it a squirt with a bit of Armour All and rub it all over. After extruding your clay, the remainder will come out easily leaving the extruder chamber fairly clean.
Photobucket

I also like to store my extruder discs with some "cheat sheets" and clay samples. I picked up this tip from Angela at Craft Goat. http://blog.craftygoat.com/2008/06/extruder_discs_get_to_know.html

Lay out your discs on the scanner, scan them in and then print them out, or print out the sheet she has provided.

Condition some scrap clay and extrude small samples from each disc and bake them.

You can glue the clay samples onto your cheat sheet or store them with your discs like I've done:

I placed each cut out sample from the cheat sheet, the matching extruder disc and the baked clay pieces into small bags. I then numbered each bag and punched a hole at the top.
Photobucket

The bags all fit on a shower hook which I hang above my clay table. Whenever I use my extruder, I have my clay sample that helps me easily decide on which size I need. I then have my print out so I know where the disc belongs after I’m through with it for storage.
Photobucket

Visit 2GoodClaymates.artfire.com